单纯用Arduino控制舵机相对简单,关于舵机的基础控制其实并不复杂,复杂点在于我们如何在各种应用场景下实现对舵机的控制。本次我们继续把舵机控制的场景进行扩展,通过Arduino和Wekinator使用滑块控制舵机。扩展阅读 使用Wekinator通过语音控制舵机。本文将详细介绍如何在Wekinator软件平台上使用编程滑块来控制舵机。窗口滑块用于向Wekinator发送OSC消息,然后将输出数据发送给处理函数,并将其转发给控制舵机的arduino。OSC(Open Sound Control)是一个协议,它主要负责完成计算机和其它多媒体设备之间的通信。OSC是一个简单而强大的功能,它被业界认为是MIDI(Musical Instrument Digital Interface)标准的继承者。OSC提供了实时声音控制和媒体处理的所有功能。

Arduino和Wekinator使用滑块控制舵机的实现步骤
在nodejs官方网站上下载并安装JavaScript node.js文件。
安装socket.io文件,socket.io将在浏览器和其他程序之间建立通信。可以通过下面的命令启动安装。
npm install socket.io
浏览器使用和配置
我们要通过浏览器接收OSC消息,必须依赖于node.js文件,node.js文件本身是不能接收消息的,OSC消息是通过WebSocket协议进行转发的。我们可以在node.js文件中找到以下代码,然后把这段代码另外保存为js文件,比如socketio.js,并将其和node.js放到同一个文件夹。
var http = require('http'),
socketio = require('socket.io'),
fs = require('fs'),
osc = require('osc-min'),
dgram = require('dgram'),
remote_osc_ip;
var http_server = http.createServer(function(req, res) {
fs.readFile(__dirname + '/socketio.html', function(err, data) {
if(err) {
res.writeHead(500);
return res.end('Error loading socket.io.html');
}
res.writeHead(200);
res.end(data);
});
});
var io = socketio(http_server);
var udp_server = dgram.createSocket('udp4', function(msg, rinfo) {
var osc_message;
try {
osc_message = osc.fromBuffer(msg);
} catch(err) {
return console.log('Could not decode OSC message');
}
if(osc_message.address != '/socketio') {
return console.log('Invalid OSC address');
}
remote_osc_ip = rinfo.address;
io.emit('osc', {
x: parseFloat(osc_message.args[0].value) || 0,
y: parseFloat(osc_message.args[1].value) || 0
});
});
io.on('connection', function(socket) {
socket.on('browser', function(data) {
if(! remote_osc_ip) {
return;
}
var osc_msg = osc.toBuffer({
oscType: 'message',
address: '/wek/inputs',
args:[{
type: 'float',
value: parseFloat(data.x) || 0
},
{
type: 'float',
value: parseFloat(data.y) || 0
}]
});
udp_server.send(osc_msg, 0, osc_msg.length, 6448, remote_osc_ip);
console.log('Sent OSC message to %s:6448', remote_osc_ip);
});
});
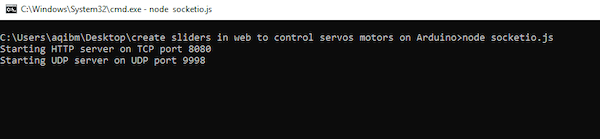
http_server.listen(8080);
console.log('Starting HTTP server on TCP port 8080');
udp_server.bind(9998);
console.log('Starting UDP server on UDP port 9998');
然后通过CMD窗口运行socketio.js文件。
node socketio.js

接下来,我们需要在web浏览器中创建一个网页示例。node script 的输出将在HTTP服务器的8080端口显示,同时要通过按键发送OSC消息并输出显示,需要插入以下网页的代码,并将代码保存到HTML文件中,并将其命名为“socketio.html”。然后把它放到socket.io文件中。打开控制页面前,需要将IP地址从http://x.x.x.x:8080切换到http://你的系统的IP地址:8080。


Processing代码
processing代码将把从Wekinator接收到的数据转发到Arduino上,实现对舵机的控制。processing将与Arduino串行和COM端口通信。Arduino IDE和processing的端口波特率应设为一致。插入下面的代码来完成从Wekinator到Arduino的数据传输。
import vsync.*; // Importing the library that will help us in sending and receiving the values from the Arduino
import processing.serial.*;  // Importing the serial library

// Below libraries will connect and send, receive the values from wekinator
import oscP5.*;
import netP5.*;

// Creating the instances
OscP5 oscP5;
NetAddress dest;
ValueSender sender;

// These variables will be synchronized with the Arduino and they should be same on the Arduino side.
public int output;
public int output1;
public int input = 2;

void setup()
{
  // Starting the serial communication, the baud rate and the com port should be same as on the Arduino side.
  Serial serial = new Serial(this, "COM8", 9600);
  sender = new ValueSender(this, serial);

  // Synchronizing the variables as on the Arduino side. The order should be same.
  sender.observe("output");
  sender.observe("output1");

  // Starting the communication with wekinator. listen on port 12000, return messages on port 6448
  oscP5 = new OscP5(this, 12000);
  dest = new NetAddress("127.0.0.1", 9998);
  sendOsc();
}


// Receive OSC messages from Wekinator
void oscEvent(OscMessage theOscMessage) {
  if (theOscMessage.checkAddrPattern("/wek/outputs") == true) {
    // Receiving the output from wekinator
    float value = theOscMessage.get(0).floatValue();  // First output
    float value1 = theOscMessage.get(1).floatValue();  // Second output

    // Converting the output to int type
      output = int(value);
      output1 = int(value1);
      println(output);
      println(output1);
  }
}

// Function to send OSC messages to browser
void sendOsc() {
  OscMessage msg = new OscMessage("/socketio");  // tell the address
  msg.add((float)input); // add the message
  msg.add((float)input); // add the message
  oscP5.send(msg, dest); //send the OSC message
}

void draw()
{
  //  Nothing to be drawn for this example
}
Arduino代码
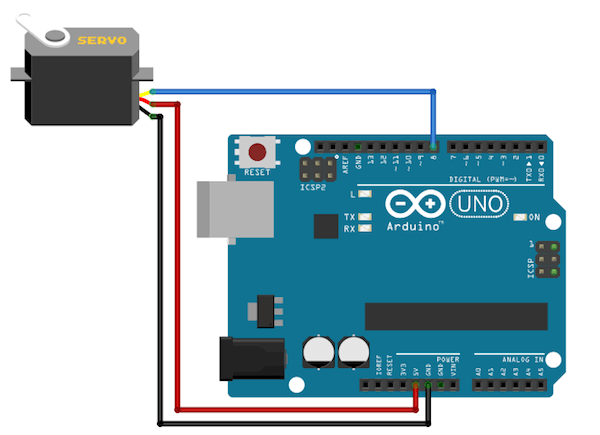
Arduino代码接收处理来自舵机的数据。下面是完整的Arduino代码,在上传代码前,一定确保processing代码没有运行。否则,Arduino将反馈端口繁忙,并返回一个错误。
#include <VSync.h>    // Including the library that will help us in receiving and sending the values from processing
#include <Servo.h>    // Including the servo library
ValueReceiver<2> receiver;  /*Creating the receiver that will receive up to 2 values.
Put the number of values to synchronize in the brackets */

/* The below two variables will be synchronized in the processing
and they should be same on both sides. */
int output;
int output1;

// Creating the instances
Servo myservo;
Servo myservo1;

void setup()
{
  /* Starting the serial communication because we are communicating with the
  Arduino through serial. The baud rate should be same as on the processing side. */
  Serial.begin(9600);

  // Initializing the servo pins
  myservo.attach(8);
  myservo1.attach(9);

  // Synchronizing the variables with the processing. The variables must be int type.
  receiver.observe(output);
  receiver.observe(output1);
}

void loop()
{
 // Receiving the output from the processing.
  receiver.sync();

  // Check for the info we're looking for from Processing
  if (output < 180) {
    myservo.write(output);
  }

  if (output1 <180)
  {
    myservo1.write(output1);
  }
}
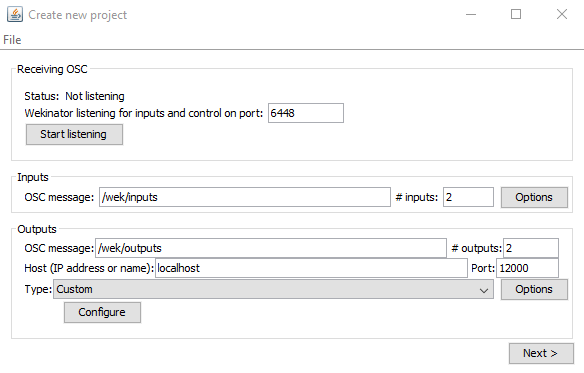
Wekinator的配置
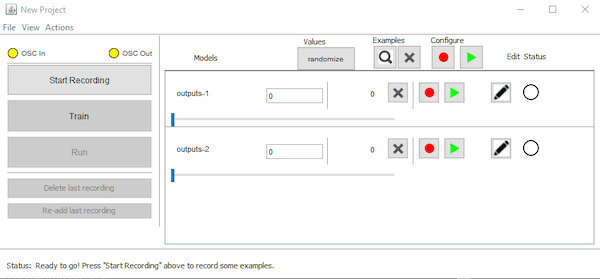
Wekinator从web浏览器 端口号为6448接收数据,分析后发送到端口12000的processing。然后,启动Wekinator并将设置参数配置为以下值。最后,将output type分配为custom并选择configure。

然后,更改最小值和最大值,将输出类型配置为整数,并选择done。
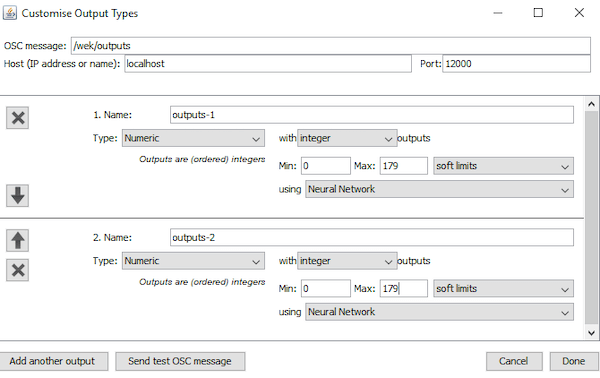

弹出的新窗口如下。

如何运行程序
在CMD命令窗口中运行socketio.js文件创建一个服务器,在浏览器中,输入PC的IP地址和8080端口,打开网页。接着在Arduino IDE中上传Arduino的代码,然后在processing中更改波特率和COM端口,并上传代码。现在可以通过移动网页上的滑块,将操作输入到Wekinator。设置好后,单击train按钮来运行,这样Wekinator就可以将数据发送给processing,我们通过调整网页上的滑块来控制舵机了。