使用Arduino和LCD1602制作计算器
在这篇文章中,我们将分享如何使用Arduino Uno和4 X 4键盘制作一个Arduino计算器。这个计算器将能够执行简单的数学运算,如加法、减法、乘法和除法,甚至可以完成浮点数运算。
电路图及说明

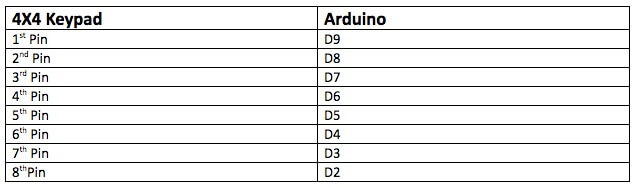
4X4键盘有8个引脚,需要从Arduino的D2连接到D9引脚,对应引脚连接如下:
然后将LCD与Arduino连接,这里使用LCD1602液晶显示模块的I2C接口进行连接,对应连接如下:

4×4键盘模块上除常规的数字按钮外,其他按钮的功能定义如下:
- “A”是加法;
- “B”是减法;
- “C”是清屏;
- “D”是除法;
- “ * ”是乘法。
代码分析
让我们分析一下整个项目,以及每一段代码的作用。文末将提供了完整的程序代码。首先,常规内容是为键盘和I2C LCD1602显示器模块添加必要的支持库。要让LCD1602显示器模块通过I2C接口与UNO进行通信,需要Arduino上的wire 库文件。然后,对应4X4键盘的按键含义,配置行与列各按键的功能。
#include<Keypad.h>
#include<LiquidCrystal_I2C.h>
#include<Wire.h>

const byte ROWS = 4;
const byte COLS = 4;
char keys[ROWS][COLS] = {
  {'1', '2', '3', '+'},
  {'4', '5', '6', '-'},
  {'7', '8', '9', 'C'},
  {'*', '0', '=', '/'}
};

byte rowPins[ROWS] = {9, 8, 7, 6};
byte colPins[COLS] = {5, 4, 3, 2};
在setup函数中,将显示“Arduino calculator by Basemu”。
lcd.begin();
  lcd.setCursor(0, 0);
  lcd.print("Arduino Calculator");
  lcd.setCursor(0, 1);
  lcd.print("by Basemu");
  delay(1000);
  scrollDisplay();
  clr();
在loop函数中,首先获取按下的键,然后判断按下的键是否是数字键,如果是数字,那么它将被存储在firstNum字符串中。
char newKey = myKeypad.getKey();
  if (newKey != NO_KEY && (newKey == '1' || newKey == '2' || newKey == '3' || newKey == '4' || newKey == '5' || newKey == '6' || newKey == '7' || newKey == '8' || newKey == '9' || newKey == '0')) {

    if (firstNumState == true) {
      firstNum = firstNum + newKey;

      lcd.print(newKey);
    }
    else {
      secondNum = secondNum + newKey;

      lcd.print(newKey);
    }
如果按下的键不是数字键,将判断它是否为“+”、“-”、“/”、“*”键(在键盘上,这些键对应“A”、“B”、“D”、“*”),如果结果为真,代码将存储下来,最为稍后会用到的值。同时将firstNum设置为false,现在设置第二个数字,它的值将存储在secondNum字符串中。
if (newKey != NO_KEY && (newKey == '+' || newKey == '-' || newKey == '*' || newKey == '/')) {
    if (firstNumState == true) {
      operatr = newKey;
      firstNumState = false;
      lcd.setCursor(15, 0);
      lcd.print(operatr);
      lcd.setCursor(5, 1);
    }
  }
最后,程序将判断,如果按下的键不是操作键,程序将检查它是否为’ = ‘。如果是,那么程序将对第一个和第二个数字执行存储操作,并输出操作结果。
if (newKey != NO_KEY && newKey == '=') {
    if (operatr == '+') {
      result = firstNum.toFloat() + secondNum.toFloat();
    }

    if (operatr == '-') {
      result = firstNum.toFloat() - secondNum.toFloat();
    }

    if (operatr == '*') {
      result = firstNum.toFloat() * secondNum.toFloat();
    }

    if (operatr == '/') {
      result = firstNum.toFloat() / secondNum.toFloat();
    }
    lcd.clear();
    lcd.setCursor(0, 0);
    lcd.print(firstNum);
    lcd.print(operatr);
    lcd.print(secondNum);
    lcd.setCursor(0, 1);
    lcd.print("=");
    lcd.print(result);
    firstNumState = true;
  }


And if the key will be 'C', then it will clear the display screen.
if (newKey != NO_KEY && newKey == 'C') {
    clr();
  }
Arduino制作计算器项目的完整代码
#include<Keypad.h>
#include<LiquidCrystal_I2C.h>
#include<Wire.h>

const byte ROWS = 4;
const byte COLS = 4;
char keys[ROWS][COLS] = {
  {'1', '2', '3', '+'},
  {'4', '5', '6', '-'},
  {'7', '8', '9', 'C'},
  {'*', '0', '=', '/'}
};

byte rowPins[ROWS] = {9, 8, 7, 6};
byte colPins[COLS] = {5, 4, 3, 2};

// Created instances
Keypad myKeypad = Keypad(makeKeymap(keys), rowPins, colPins, ROWS, COLS);
LiquidCrystal_I2C lcd(0x27, 16, 2);

boolean firstNumState = true;
String firstNum = "";
String secondNum = "";
float result = 0.0;
char operatr = ' ';

void setup() {
  lcd.begin();
  lcd.setCursor(0, 0);
  lcd.print("Arduino Calculator");
  lcd.setCursor(0, 1);
  lcd.print("by Basemu");
  delay(1000);
  scrollDisplay();
  clr();
}

void loop() {
  char newKey = myKeypad.getKey();
  if (newKey != NO_KEY && (newKey == '1' || newKey == '2' || newKey == '3' || newKey == '4' || newKey == '5' || newKey == '6' || newKey == '7' || newKey == '8' || newKey == '9' || newKey == '0')) {

    if (firstNumState == true) {
      firstNum = firstNum + newKey;

      lcd.print(newKey);
    }
    else {
      secondNum = secondNum + newKey;

      lcd.print(newKey);
    }
  }
  if (newKey != NO_KEY && (newKey == '+' || newKey == '-' || newKey == '*' || newKey == '/')) {
    if (firstNumState == true) {
      operatr = newKey;
      firstNumState = false;
      lcd.setCursor(15, 0);
      lcd.print(operatr);
      lcd.setCursor(5, 1);
    }
  }

  if (newKey != NO_KEY && newKey == '=') {
    if (operatr == '+') {
      result = firstNum.toFloat() + secondNum.toFloat();
    }

    if (operatr == '-') {
      result = firstNum.toFloat() - secondNum.toFloat();
    }

    if (operatr == '*') {
      result = firstNum.toFloat() * secondNum.toFloat();
    }

    if (operatr == '/') {
      result = firstNum.toFloat() / secondNum.toFloat();
    }
    lcd.clear();
    lcd.setCursor(0, 0);
    lcd.print(firstNum);
    lcd.print(operatr);
    lcd.print(secondNum);
    lcd.setCursor(0, 1);
    lcd.print("=");
    lcd.print(result);
    firstNumState = true;
  }

  if (newKey != NO_KEY && newKey == 'C') {
    clr();
  }
}

void scrollDisplay() {
  // scroll 13 positions (string length) to the left
  // to move it offscreen left:
  for (int positionCounter = 0; positionCounter < 3; positionCounter++) {
    // scroll one position left:
    lcd.scrollDisplayLeft();
    // wait a bit:
    delay(300);
  }
  delay(1000);

  // scroll 29 positions (string length + display length) to the right
  // to move it offscreen right:
  for (int positionCounter = 0; positionCounter < 3; positionCounter++) {
    // scroll one position right:
    lcd.scrollDisplayRight();
    // wait a bit:
    delay(300);
  }
  delay(2000);
}

void clr() {
  lcd.clear();
  lcd.setCursor(0, 0);
  lcd.print("1st: ");
  lcd.setCursor(12, 0);
  lcd.print("op ");
  lcd.setCursor(0, 1);
  lcd.print("2nd: ");
  lcd.setCursor(5, 0);
  firstNum = "";
  secondNum = "";
  result = 0;
  operatr = ' ';
}
至此,基于Arduino和LCD 16×2液晶显示模块制作的计算器就完成了。


")


