在本文中,我们将了解如何使用Arduino与openFrameworks平台进行通信。openFrameworks是一个采用c++进行编写的开源工具包,它可以用于很多原型项目的设计,甚至可以生成很多有趣的UI元素。安装和使用openFrameworks工具包,大家可以通过openFrameworks网站上的指南来了解平台的使用。
本文将介绍如何让Arduino与openFrameworks通信。例如,当单击程序的窗口时,它将在窗口中显示一条消息,连接Arduino并打开与Arduino连接的LED。
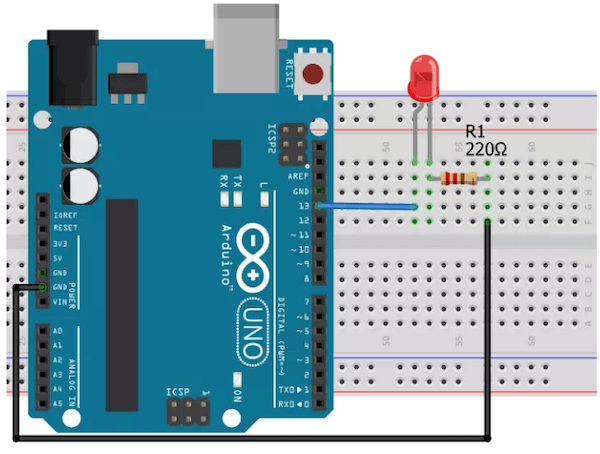
电路原理图
本文的难点之一是正确连接LED和Arduino。我们将通过一个220欧姆电阻将LED的正极连接到Arduino的13针,负极连接到Arduino的GND针。

Arduino Code
一旦Arduino接收到来自openFrameworks平台的数据,它就会响应一条消息。将下面的代码上传到Arduino,这样就可以发送和接收数据了。
注意:注意串口冲突,因为openframework和Arduino IDE使用相同的COM端口。
// Code to send and receive data from openFrameworks
bool ledState = false; // Variable for storing the led state
int ledPin = 13;

void setup() {
  // Start the serial communication
  Serial.begin(9600);
  pinMode(ledPin, OUTPUT);  // Declaring the LED pin as output
}

void loop() {
  if (Serial.available()) { // If there is any data available
    char inByte = Serial.read(); // store the incoming data
    if (inByte == 1) {    // Whether the received data is '1'
      ledState = !ledState; // Change the LED state
      digitalWrite(ledPin, ledState); // Turn the LED
    }

    if (ledState == true) {
      char mystr[10] = "LED is OFF";
      Serial.write(mystr, 10); // send the response in return
    }
    else if (ledState == false) {
      char mystr[10] = "LED is ON ";
      Serial.write(mystr, 10); // send the response in return
    }
  }
}
openFrameworks Code
有三个单独的文件包含openFrameworks代码。
Main.cpp
Main.cpp用于运行应用程序并打开输出窗口。
#include "ofMain.h"
#include "ofApp.h"

//========================================================================
int main( ){

	ofSetupOpenGL(640,480, OF_WINDOW);			// <-------- setup the GL context

	// this kicks off the running of my app
	// can be OF_WINDOW or OF_FULLSCREEN
	// pass in width and height too:
	ofRunApp( new ofApp());

}
OfApp.cpp
OfApp.cpp将允许Arduino和openframework进行串行通信。
#include "ofApp.h"

//--------------------------------------------------------------
void ofApp::setup(){
	serialMessage = false;

	serial.listDevices();
	vector  deviceList = serial.getDeviceList();

	// this should be set to whatever com port your serial device is connected to.
	// (ie, COM4 on a pc, /dev/tty.... on linux, /dev/tty... on a mac)
	// arduino users check in arduino app....
	int baud = 9600;
	serial.setup(0, baud); //open the first device
	//serial.setup("COM10", baud); // windows example
	//serial.setup("/dev/tty.usbserial-A4001JEC", baud); // mac osx example
	//serial.setup("/dev/ttyUSB0", baud); //linux example
}

//--------------------------------------------------------------
void ofApp::update(){
	if (serialMessage) {
		serialMessage = false;
		serial.writeByte(sendData); // sending the data to arduino

		serial.readBytes(receivedData, 10); // Getting the data from Arduino
		printf("receivedData is %d \n", receivedData);	// Printing in ASCII format
	}
}

//--------------------------------------------------------------
void ofApp::draw(){
	ofBackground(0);	// Black background
	ofSetColor(255);	// Text color is white

	string msg;
	msg += "Click to turn LED \n";
	msg += receivedData;
	ofDrawBitmapString(msg, 200, 200); // Write the data on the output window
}

//--------------------------------------------------------------
void ofApp::mousePressed(int x, int y, int button){
	serialMessage = true;
}
在setup函数中,程序将搜索并连接到串口。update函数中,当用户单击输出窗口时,它向Arduino发送数据。Arduino准备接收信息,因此它将立即响应一条消息,然后openFrameworks程序将存储到一个数组中。在draw 函数部分,输出窗口的背景颜色设置为黑色,文本颜色设置为白色,这将利于反映在Arduino发送的数据如何在窗口中被格式化。
OfApp.h
OfApp.h文件是组成头文件的代码段。
#pragma once

#include "ofMain.h"

class ofApp : public ofBaseApp{

	public:
		void setup();
		void update();
		void draw();
		void mousePressed(int x, int y, int button);

		bool serialMessage;			// a flag for sending serial
		char receivedData[10];		// for storing incoming data
		char sendData = 1;	// for sending data

		ofSerial	serial;
};
如何运行openFrameworks程序
使用openFrameworks的项目生成器创建一个新项目(本例不需要附加组件),然后就可以使用上面的代码来构建这个项目。如果得到的输出窗口与下面所示的窗口相同,那项目已经成功实现了。

单击输出窗口内的按钮,Arduino响应这个动作,应该可以打开或关闭LED。同时返回一个消息,该消息将出现在窗口中,如上所示。
