使用Arduino制作摩尔斯电码收发器
日常生活中,我们与他人交流通常都是采用语言、手势、文字、图像等方式进行。你是否想过,当你想和别人分享一些秘密信息时,该怎么做呢?我想大家多数都会采用一些彼此约定且相互可识别的符号或手势进行吧。本文将介绍如何使用Arduino制作摩尔斯电码收发器,来进行密文的通信。
摩尔斯电码
摩尔斯电码(摩斯电码,Morse code)发明于1835年,是由美国人艾尔菲德·维尔发明,当时他正在协助Samuel Morse进行摩尔斯电报机的发明。 摩尔斯电码是原始的数字通信形式,它与只使用“0”和“1”的二进制代码不同,它的代码主要包括五种形态: 点、划、点划之间的停顿、每个字符间的短停顿、每个词之间中等的停顿以及句子之间长的停顿。

摩尔斯电码通过不同的排列顺序来表达不同的英文字母、数字和标点符号等。在今天,国际摩尔斯电码依然被使用着。比如,摩尔斯电码最广为人知的用法发送求救信号SOS,SOS信号的组合方式为:![]()
![]()
![]() 。再比如,假设我们通过摩尔斯电码发送“Arduino”,组合方式为:“.- .-. -.. ..- .. -. —”。
。再比如,假设我们通过摩尔斯电码发送“Arduino”,组合方式为:“.- .-. -.. ..- .. -. —”。
如何使用Arduino制作摩尔斯电码收发器
电路部分
Arduino到面包板的引脚说明:
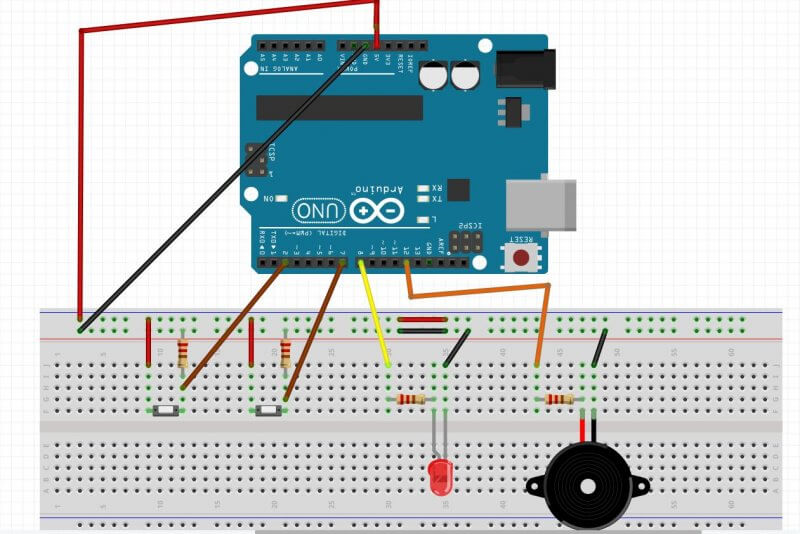
- 引脚D2连接到按钮1的一端,再通过电阻接地,按钮1另一端接5V。
- 引脚D7连接到按钮2的一端,再通过电阻接地,按钮2另一端接5V。
- 引脚D8通过电阻连接到LED正极,负极接地。
- 引脚D12通过电阻与蜂鸣器正极连接,负极接地。
代码部分
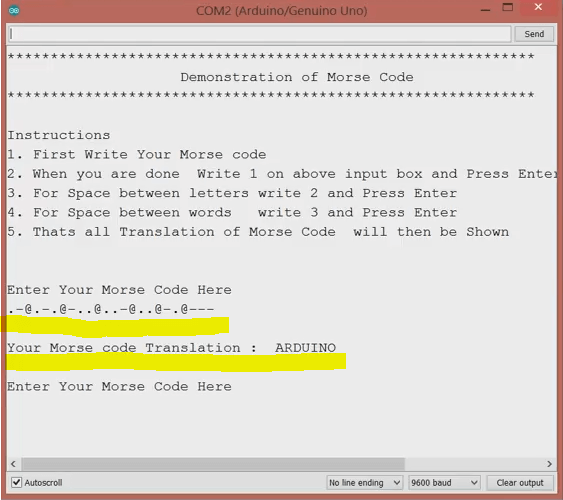
文末是完整的代码,将其保存为MorseCode.ino,然后打开Arduino IDE “File->Open->MorseCode.ino”,上传到Arduino。上传完成后,打开串口监视器,你将看到如下的显示内容:
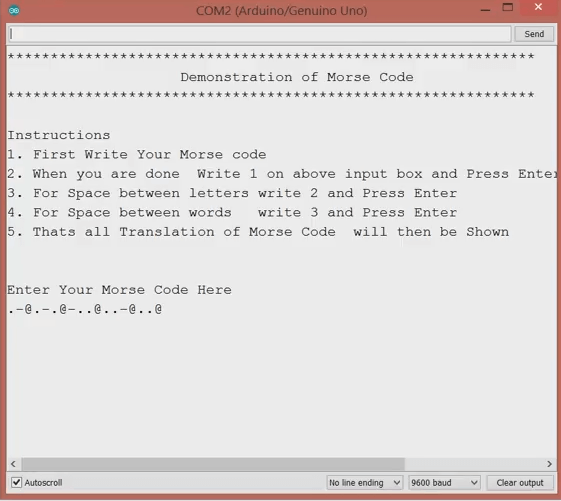
摩尔斯码译码器的操作顺序:首先通过点击按钮1和按钮2来写摩尔斯码;字母之间的空格,可在上面的输入框中填2,然后按回车键。单词之间的空格,在上面的输入框中填3,然后按回车键。所有输入完成后,在上面的输入框中填1,然后按回车键,将会翻译摩尔斯码的内容。翻译后的莫尔斯电码将显示在串口监视器的下面。例如:我们来写“.- .-. -.. ..- .. -. —”,翻译后将显示为“ARDUINO”。
这样,使用Arduino制作的摩尔斯码收发器就算完成了。
完整Arduino代码如下:
/*
  This Program is for demonstration of MORSE CODE Communication
  which was use to send information secretly using codes of combinations dots .  and dashes -
  Thanks to open source community

*/


#define SIZE 26
const int ledPin=8;
const int speakerPin=12;
const int dotButton=2;
const int dashButton=7;

String morseCode="";
String text="";
int characterAscii=0;
int startPos=0, endPos=0;
int startPos1=0, endPos1=0;
String characterCode="";
int dashButtonState=0;
int dotButtonState=0;


//Array of MorseCode for letters of English Language A to Z
String letters[SIZE]={

// A to I
".-", "-...", "-.-.", "-..", ".", "..-.", "--.", "....", "..",
// J to R
".---", "-.-", ".-..", "--", "-.", "---", ".--.", "--.-", ".-.",
// S to Z
"...", "-", "..-", "...-", ".--", "-..-", "-.--", "--.."
};


void setup() {
  // put your setup code here, to run once:
//Getting things Ready
pinMode(ledPin, OUTPUT);
pinMode(dotButton, INPUT);
pinMode(dashButton, INPUT);
Serial.begin(9600);

Serial.println("*************************************************************");
Serial.println("                    Demonstration of Morse Code              ");
Serial.println("************************************************************* ");
Serial.println("\nInstructions");
Serial.println("1. First Write Your Morse code");
Serial.println("2. When you are done  Write 1 on above input box and Press Enter or click Send Button ");
Serial.println("3. For Space between letters write 2 and Press Enter ");
Serial.println("4. For Space between words   write 3 and Press Enter ");

Serial.println("5. Thats all Translation of Morse Code  will then be Shown ");

Serial.println("\n\nEnter Your Morse Code Here  ");

}


void loop() {
  // put your main code here, to run repeatedly:

while(Serial.available() > 0 )
{
      int ascii=Serial.read();

      switch(ascii)
      {
        case 49: // 49 is Ascii value of 1

        Serial.print("\n");
        morseCode.concat('#');// Placeing # at the end of morseCode to simplify further processing

         Serial.print("\nYour Morse code Translation :  ");

        endPos1=morseCode.indexOf('#');

        while(endPos1 < morseCode.length() )
        {
            extractLetters(morseCode.substring(startPos1, endPos1)); // This function would extract Letter as name suggest and would convert  code to text SIMPLE!
           startPos1=endPos1+1;
           if(startPos1 == morseCode.length() )
           {
              break;
           }
           endPos1= morseCode.indexOf('#', startPos1);
        }
        startPos1=0;
        endPos1=0;

        text=""; //  For New Translation
        morseCode="";
        Serial.println("\n\nEnter Your Morse Code Here ");


        break;

        case 50: // 50 is Ascii value of 2

        morseCode.concat("@");
        Serial.print("@");
        delay(200);

        break;

        case 51: // 51 is Ascii value of 3

        morseCode.concat("#");
        Serial.print("#");
        delay(200);

        break;

      }

}

process();

}

void turnONLedSpeaker()
{
  //Turn ON LED
  digitalWrite(ledPin, HIGH);
  tone(speakerPin, 4699, 300); // tone(speakerPin, frequency, duration in milliSec)

}

void process()
{

  dotButtonState=digitalRead(dotButton);
dashButtonState=digitalRead(dashButton);


  if(dashButtonState == HIGH)
  {
    turnONLedSpeaker();

    morseCode.concat("-"); // Storing code in variable morseCode with the help of concatenation function
    Serial.print("-");//Prints User entered Code
    delay(200);
  }
  else if(dotButtonState == HIGH)
  {
   turnONLedSpeaker();

   morseCode.concat(".");
   Serial.print(".");
   delay(200);

  }
  else
  {
    //Turn OFF LED
    digitalWrite(ledPin, LOW);

  }

}

char convertIntoText(String characterCode)
{
  characterAscii=65;

  for(int index=0; index<SIZE; index++)
  {
    if(characterCode == letters[index])
    {
      return characterAscii;
    }
    characterAscii++;
  }

}

void extractLetters(String words)
{
        words.concat('@'); // Placeing @ at the end of word to simplify further processing

        endPos=words.indexOf('@');


        //Loop to extracting single character morse Code from string of word
        while( endPos<words.length() )
       {
         characterCode=words.substring(startPos, endPos);

         //Now CharacterCode will now convert in text

         text.concat(convertIntoText(characterCode));

         startPos=endPos+1;
         characterCode="";

          // if condition is just to terminate loop when our extracting single character code is complete thats all
         if(startPos == words.length() )
         {
           break;
         }

         endPos=words.indexOf('@', startPos);

       }


        Serial.print(text);
        Serial.print(" ");
        startPos=0;
        endPos=0;
        text="";

}


")


