如何使用Arduino测量舵机的扭矩
在日常生活中,我们经常会看到一些产品的技术参数,这些参数与实际使用数据都会存在一些差距,但它也是用户选择产品的重要参考。比如智能手机制造商会宣称他们的电池使用寿命如何长,科技公司会宣称他们的科技产品是最具科技含量,而汽车公司则吹嘘自己汽车的燃油经济性如何好,其实这些数据有相当部分是存在虚标的。
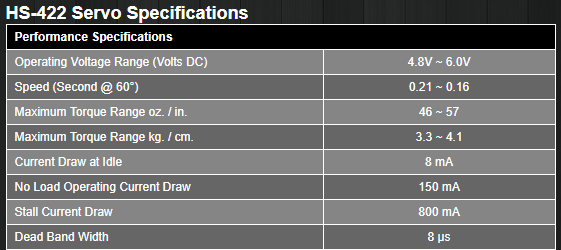
我们经常使用的舵机也不例外,舵机制造商也会对他们生产的舵机给出各种各样的技术参数,其中诸如电机能够产生的扭矩等。如下图,HS-422舵机的技术参数
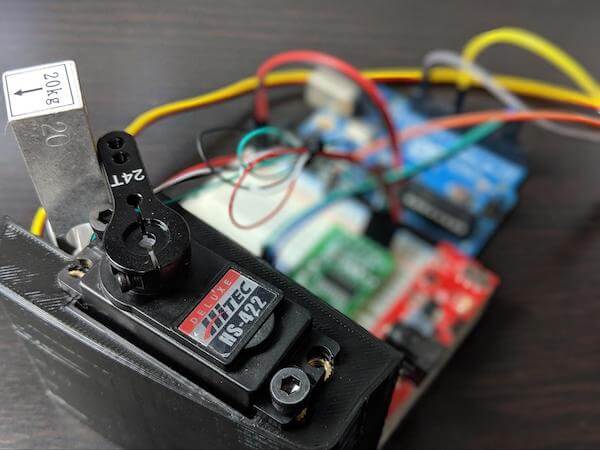
在这个项目中,我们将建立一个测量舵机扭矩范围的工具,目的是验证舵机实际产生的扭矩与技术参数中所标称的扭矩是否相符。整个实验会用到一个测力量的部件,一个Arduino Uno,一个3D打印的舵机框架,和其他一些部件,然后测量舵机实际产生的扭矩。
实验器件清单
- Arduino Uno
- 20kg测压杆
- HX711称重传感器模块
- 面包板电源
- 面包板
- 跳线
- M4×6mm螺丝
- M4嵌入式螺母
如何测量舵机的扭矩
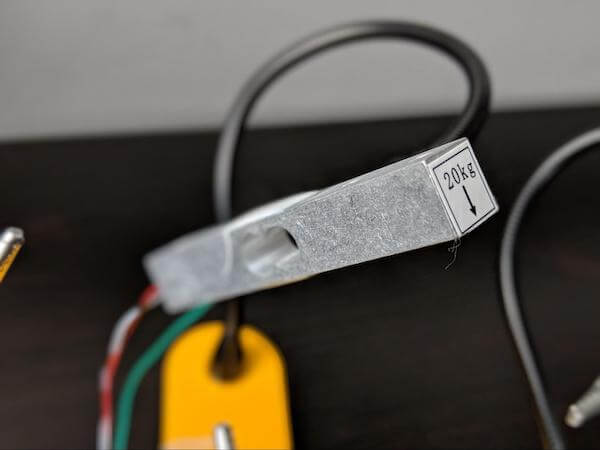
力矩是通过力与距离的乘积来计算得出的。在这个项目中,要获得舵机的力会有些困难,因此,需要使用一个负载单元。在设计和使用测压元件时会涉及到许多复杂的细节,但在本项目中,测压元件是一种传感器,它允许计算机将微小的电压变化转化为力的形式呈现出来。使用测力元件,我们就能够测量舵机的旋转轴和舵机臂之间的精确距离。
当舵机开始旋转时,它就会对测压元件产生推力,结合测压元件受到的测力以及旋转轴和伺服臂的距离,就可以计算出由测力元件传递的扭矩。
构建测试工具
测试工具的机械结构比较简单,它由两个3D打印零件和几个紧固件组成。你可以下载本文附带的3D打印部件的设计文件(提取码:9t4e)。

3D打印件没有特殊的要求,所以使用任何材料打印都可以。
装配测试工具
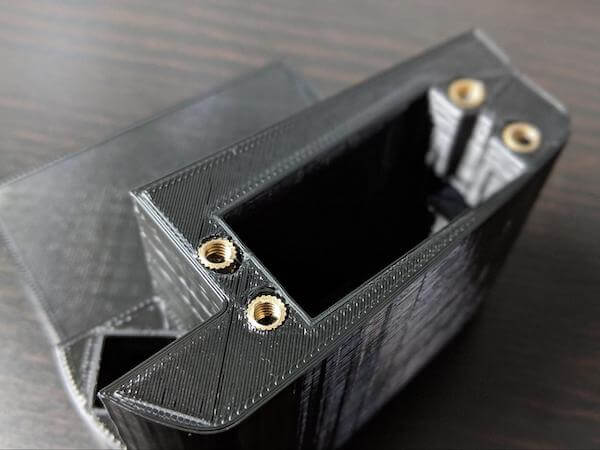
装配舵机扭矩测量工具的第一步是安装嵌入式螺母,嵌入式螺母可以使安装更安全,不会损坏3D打印框架。安装螺母时,可以轻轻将其按下插入塑料孔后,使用烙铁对其加热,当你移开烙铁后,熔化的塑料会在镶件周围凝固,形成非常牢固的连接,这样就可以完成安装了。
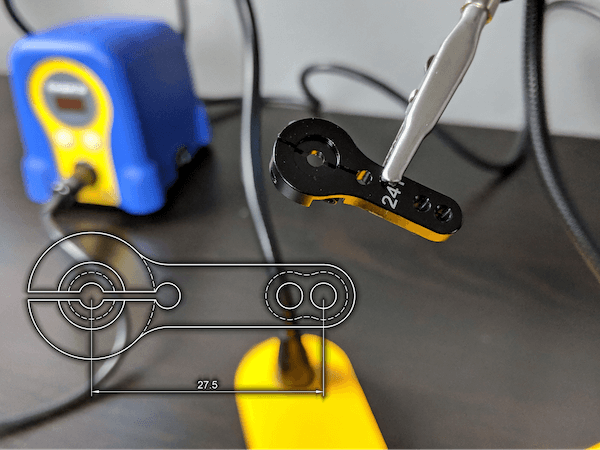
接下来,安装测压元件,其一侧有一个绿色箭头。将测压元件朝上,箭头指向远离舵机的方向,然后将测压元件插入旁边的正方形中。测压元件应该保持稳固,确保安装过程中没有摇晃的空隙。

然后,在面包板背面贴一块双面胶,把它粘在3D打印的框架上。

完成了框架搭建,余下的就是电路的搭建了,请看下面的电路图。
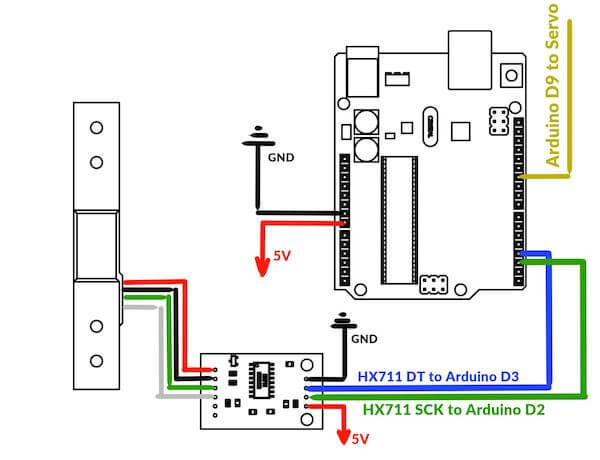
电源连接:
- Arduino GND -> 面包板 GND
- HX711 GND -> 面包板 GND
- 舵机 黑线 -> Arduino GND
- Arduino Vin -> 面包板 VCC
- HX711 VCC -> 面包板 VCC
- 舵机 红线 -> Arduino 5V
信号连接:
- 舵机 黄线 -> Arduino D9
- HX711 DT针 -> Arduino D3
- HX711 SCK针 -> Arduino D2
测压元件连接:
- 测压元件红线 -> HX711 E+针
- 测压元件黑线 -> HX711 E-针
- 测压元件绿线 -> HX711 A-针
- 测压元件白线 -> HX711 A+针
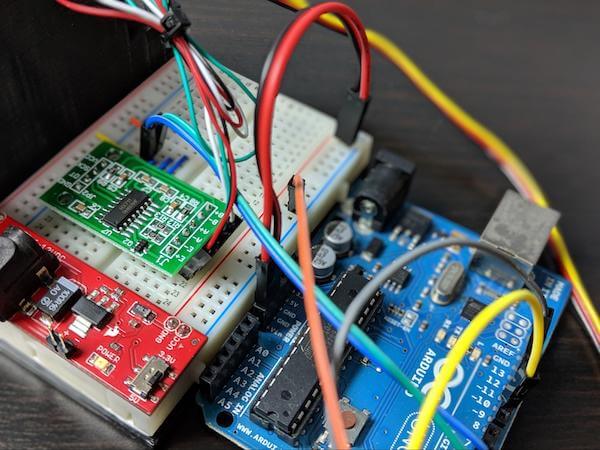
完成组装的成品图
Arduino测试代码
/*
Project: Measuring Servo Torque
Author: Toglefritz

This project involves a simple device used to measure the torque output of a hobby-scale servo. The device consists of a 3D printed frame that will hold a servo and a load cell. The servo rotates a horn into the load cell, producing a reading from the load cell. From the known distance between the servo's center of rotation and the load cell, the servo's torque can be calculated from the force on the load cell.

Complete documentation for the project can be found on Maker Pro.
*/

// Include libraries for interfacing with the HX711 and the servo
#include "HX711.h"
#include <Servo.h>

// Configuration
#define calibration_factor -7050.0  // This value is obtained using the    HX711_Calibration sketch
int trialRuns = 5;    // This defines the number of times to measure the servo's force on the
                      // load cell. These measurments will be averaged to come up with a single reading.
float armLength = 2.75;   // This is the distance (in cm) between the servo's center of rotation and the load cell.
                          // This is based on the mechanical design of the test fixture.

// Define connections between the HX711 and the Arduino
#define DT  3   // The HX711 DT pin connects to D3 on the Arduino
#define SCK  2  // The HX711 SCK pin connects to D2 on the Arduino

// Initialize the HX711
HX711 loadCell(DT, SCK);

// Create a servo object
Servo testServo;

void setup() {
  // Begin Serial communication
  Serial.begin(9600);
  Serial.println(" - Torque Measurement Tool - ");  // Print a heading
  Serial.println();

  // Set the pin used to control the servo
  testServo.attach(9);

  loadCell.set_scale(calibration_factor); // This value is obtained by using the HX711_Calibration sketch
  loadCell.tare(); // Reset the scale to zero to compensate for any existing load

  // To begin the test, the servo horn should be attached so that it is making contact with
  // the load cell at an angle of 140 degrees on the servo
  testServo.write(140); // Move the servo into the load cell

  Serial.println("Initialization complete.");
  Serial.println("Send 's' to begin testing. Send 'h' for help.");
  Serial.println();
}

void loop() {
  // If the user sends 's' over Serial, begin testing the torque
  if(Serial.read() == 's' || Serial.read() == 'S') {
    measureTorque();
  }

  // If the user sends 'i' over Serial, show some instructions
  if(Serial.read() == 'h' || Serial.read() == 'h') {
    Serial.println("Right now, the Arduino has moved the servo into its starting position.");
    Serial.println("In the servo's current position, install the horn so that it is just touching the load cell.");
    Serial.println("When you are ready, send 's' over Serial and the Arduino will begin testing the servo's torque.");
    Serial.println("You will see the Arduino move the servo into the load cell five different times.");
    Serial.println("Each time the servo hits the load cell, the Arduino will take a reading.");
    Serial.println("Those readings will be averaged to calculate the torque delivered by the servo.");
    Serial.println("Keep an eye on the Serial monitor to see the results.");
    Serial.println();
    Serial.println("Send 's' to begin testing.");
    Serial.println();
  }
}

void measureTorque() {
   /*
      To test the servo's torque, the Arduino will move the servo arm so that it presses on the load
      cell. The resulting force will produce a reading from the load cell. The Arduino will take
      five readings to compute an average force value. Because the distance between the servo's
      center of rotation and the load cell is known from the frame design, the Arduino
      can calculate the torque produced by the servo.
    */
    Serial.println("Individual Readings: ");

    float individualReadings[trialRuns];  // This array will store the load cell readings for the five tests

    for(int i = 0; i < 5; i++) {
      testServo.write(180); // Move the servo away from the load cell
      delay(1000);   // Wait for the servo to move
      loadCell.tare(); // Reset the scale to zero to compensate for any existing load
      testServo.write(130); // Move the servo into the load cell. A 130 degree angle is actually inside the load
                            // cell, so the servo will be pushing towards that position, exerting force on
                            // the load cell.
      delay(1000);   // Wait for the servo to move
      individualReadings[i] = loadCell.get_units(); // Take a measurment from the load cell
      Serial.print(individualReadings[i]);   // Print the measurment over Serial
      Serial.print("   ");
    }

    // Now that we have five individual readings, average them to get one average load reading
    float readingsSum = 0;  // Create a variable to store the sum of all readings
    // Loop through the array and add together all the readings
    for(int y = 0; y < trialRuns; y++) {
      readingsSum = readingsSum + individualReadings[y];
    }

    float averageReading = readingsSum / trialRuns; // Divide by the numer of readings to get the average

    Serial.println();
    Serial.println();
    Serial.println("Average Reading:");   // Print the average reading over Serial
    Serial.println(averageReading);

    // From the average reading, calculate the torque delivered by the servo
    // using the formula T = F * r where T is the torque, F is the load cell
    // reading (a force), and r is the radius of rotation (the distance between
    // the servo and the load cell).
    // The units for the torque will be kg*cm
    float servoTorque = averageReading * armLength;   // Calculate the torque

    Serial.println();
    Serial.println("Torque:");    // Print the torque
    Serial.print(servoTorque);
    Serial.println(" kgcm");

    testServo.write(180); // Move the servo away from the load cell after the testing is complete
}
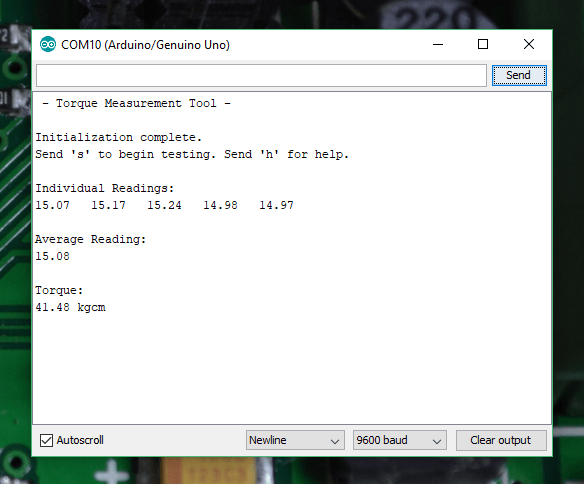
系统启动后,将会打开一个串口监视器,当我们准备开始测量时,系统将提示你通过串口发送“s”开始。

Arduino将测量这个舵机产生的力,并将它转换成扭矩,最后将结果发送给串口监视器上。