树莓派安装Windows 10 IoT 并实现远程连接
Windows 10 IoT core是Windows 10的精简版,是专门为使用树莓派(Raspberry Pi)等系统进行设计的。Windows 10 IoT core 的一个重要特性是允许用户访问
.Net framework 来使用物联网应用程序。
名词解释:IoT 英文全称是:“Internet of things”。物联网就是物与物相连的互联网。有两层意思:1,物联网的核心和基础仍然是互联网,是在互联网基础上的延伸和扩展的网络;2, 物联网的 用户端扩展到了任何物品与物品之间,进行信息交换和通信。
然而,要实现在树莓派上安装Windows 10 IoT并不是一件容易的事情,所以在本文将带大家一起来做。
安装Windows 10
要在树莓派上安装Windows 10 IoT,首先你的笔记本电脑或台式电脑上必须是Windows 10系统,这是一个先决条件,但使用Windows 10也有一些好处:
- Windows 10价格便宜;
- 安装比其他Windows系统简单;
- 看上去逼格较高,主要是顺应时代发展。
下载 Windows 10 IoT Core 控制台
在树莓派上使用Windows 10 IoT与使用其他操作系统略有不同,windows 10 IoT版本的使用没有这么直接。怎么说呢?像Raspbian,你需要下载ISO文件,再将其刷到SD卡,然后插入树莓派,启动后可以进入桌面才能使用Python或C++。然而使用Windows IoT 你需要通过远程来完成,具体怎么做?我们下面详述,下面是控制台的下载地址: download from Microsoft’s website 。
创建树莓派 Windows 10 IoT image
先将micro SD卡通过读卡器连接到PC系统,然后才能创建树莓派Windows 10 IoT 映像。运行Windows 10 IoT 控制台,在窗口左侧面板点击“Setup a new device ”。
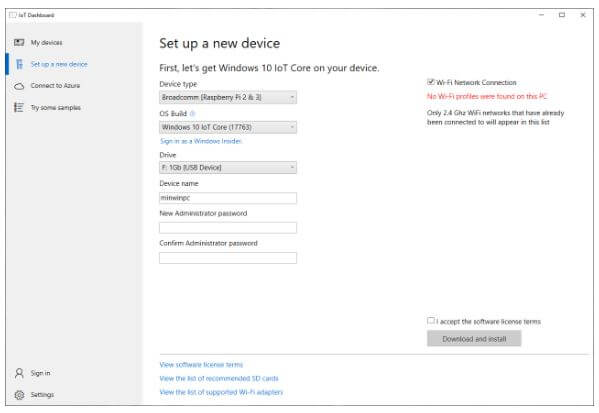
Device Type选择“ Raspberry 2和Raspberry 3 ”,OS build选择最新的Windows 10 IoT版本, Drive中选择到你的SD卡。这里,还可以输入设备名称和管理密码。 一切准备好后,勾选底部的复选框,点击“Download and Install ”。这样树莓派的 Windows 10 IoT image 就制作完成了,把SD卡插入树莓派备用。
下载安装Visual Studio 2017
Visual Studio 2017 是免费的,但需要一个微软账户,你可以免费注册。 下载地址如下: Visual Studio 2017 。安装Visual Studio 2017会需要一些时间,您可去喝杯茶再继续,安装过程中,选择默认选项即可。
运行Visual Studio 2017
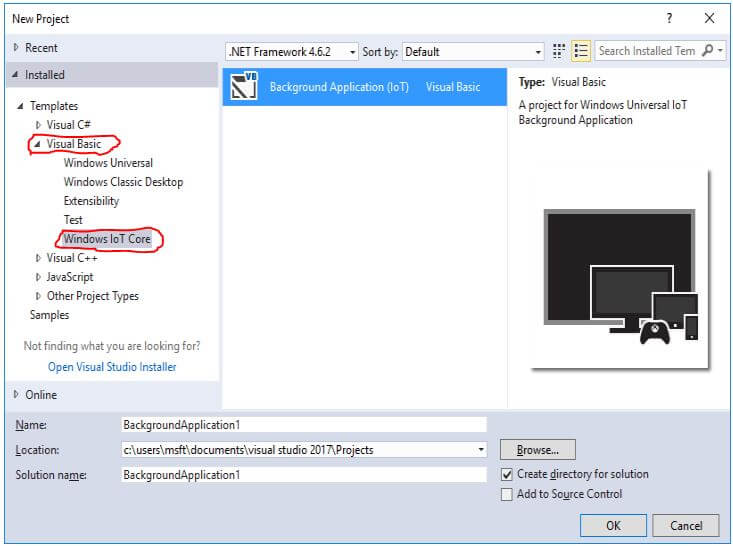
接下来,运行Visual Studio 2017, 创建一个“Universal Application” ,菜单选择顺序 “ File > New Project”,然后选择“ Visual Basic > Windows Universal > Blank App ” , 这时,系统将提示没有库,这需要我们对应安装所需的组件。这一步是很必要的,只有这样Windows才能支持树莓派(ARM设备)。
我们回到为Pi创建的应用, 我们将使用不同的项目模板(稍后对此进行更多介绍)。
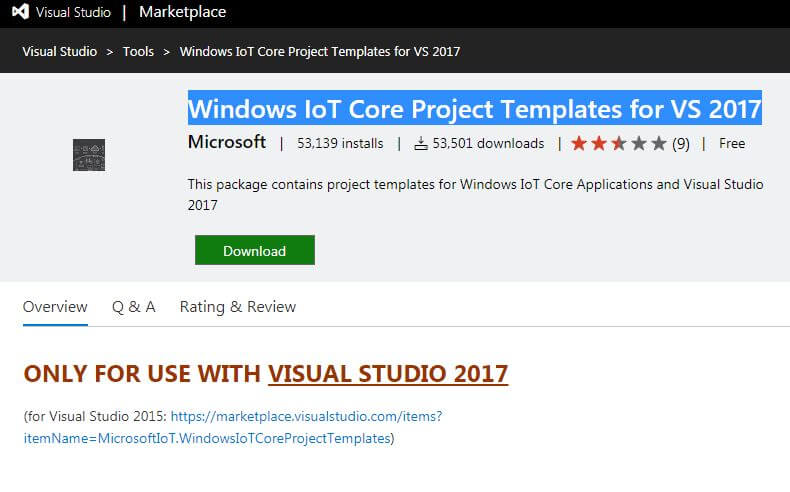
获取Windows 10 IoT 模板
Visual Studio 2017需要安装一些组件,下载地址: Windows 10 IoT项目模板 网页顶部下载“ Windows IoT Core Project Templates for VS 2017 ”。
下载之后,先关闭之前打开的 Visual Studio 2017。 然后运行并安装应用程序所需的模板文件。重新打开Visual Studio 2017来检查它是否工作,导航到 “ File > New Project”,检查Visual Basic下是否有“Windows IoT Core”选项。
打开树莓派安装windows
在Pi上安装Windows IoT core相对简单,提前需要做的准备:
- 显示器
- HDMI线
- 鼠标
- 键盘
- 网络
确保树莓派运行在和计算机相同的网络上。本文中,我的树莓派连接到局域网,我的计算机、打印机和服务器都在该局域下。
注意:树莓派上运行Windows IoT核心启动速度非常慢,所以请耐心等待!
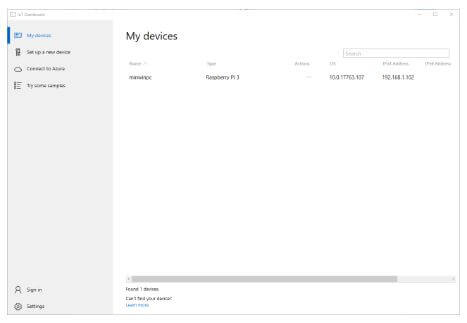
如果一切顺利,树莓派已经启动成功,那么回到Windows IoT控制台,查看设备是否在我的设备下的列表中。
确认Visual Studio 2017 正常工作
最后一步是查看Visual Studio是否可以编译Windows IoT核心程序并远程调试树莓派。没错,可以远程编程和调试树莓派,在没有显示器或键盘的单片机上进行开发时这个非常有用。
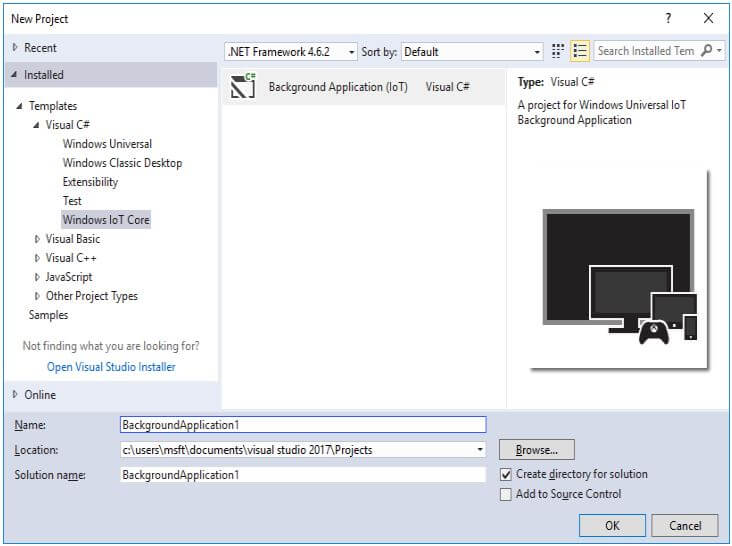
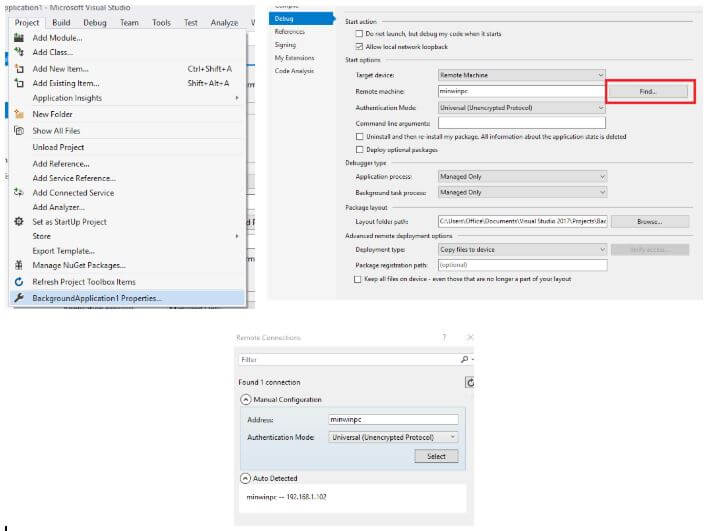
创建一个新的Windows IoT后台应用程序,点击“ File > New Project” ,然后在Windows IoT下选择后台应用程序“Background Application ”。
在StartupTask.vb文件中删除所有代码并输入下面的代码(以GPIO26为例)。
Imports Windows.ApplicationModel.Background
Imports Windows.Devices.Gpio
Imports Windows.System.Threading

Public NotInheritable Class StartupTask
    Implements IBackgroundTask

    Const LED_PIN As Short = 26
    Const INTERVAL As Short = 1   'Interval in seconds
    Private gpio
    Private pin As GpioPin
    Private pinValue As GpioPinValue
    Private blinktimer As ThreadPoolTimer
    Private cancelled As Boolean = False
    Private deferral As BackgroundTaskDeferral = Nothing


    Public Sub Run(taskInstance As IBackgroundTaskInstance) Implements IBackgroundTask.Run

        'Handler for cancelled background task
        AddHandler taskInstance.Canceled, New BackgroundTaskCanceledEventHandler(AddressOf onCanceled)

        'Background task continues to run even after IBackgroundTask.Run returns
        deferral = taskInstance.GetDeferral()

        'Initialize GPIO
        initGPIO()

        'Create a periodic timer
        blinktimer = ThreadPoolTimer.CreatePeriodicTimer(New TimerElapsedHandler(AddressOf blinktimer_tick), TimeSpan.FromMilliseconds(1))

    End Sub

    Private Sub onCanceled(sender As IBackgroundTaskInstance, reason As BackgroundTaskCancellationReason)
        cancelled = True
    End Sub

    Sub blinktimer_tick(state As Object)

        If Not cancelled Then
            'Toggele Pin Value
            If (pinValue = GpioPinValue.High) Then
                pinValue = GpioPinValue.Low
            Else
                pinValue = GpioPinValue.High
            End If

            pin.Write(pinValue)
        Else
            'if the task is cancelled
            'Stop the timer And finish execution
            blinktimer.Cancel()
            deferral.Complete()
        End If
    End Sub

    Private Sub initGPIO()
        'Get the default GPIO controller for the system
        gpio = GpioController.GetDefault()

        If Not gpio Is Nothing Then
            'Open a connection to the GPIO Pin
            pin = gpio.openpin(LED_PIN)
            pinValue = GpioPinValue.Low

            'Write Pin value low to turn on LED
            pin.Write(pinValue)

            'Set the pin for output
            pin.SetDriveMode(GpioPinDriveMode.Output)
        End If

    End Sub

End Class
要对树莓派编写程序,需要导航到“Project – >Properties”,并在Debug下单击“Find next to Remote machine”。设备应该在“Auto Detected”下找到。
之后,可以进行测试了。单击顶部表示远程机器的绿色箭头图标。
如果你收到一条消息,说构建成功并开始部署,那么你已经为创建物联网应用程序做好了准备! 以后就可以自由发挥了!


