如何通过机器学习使用Wekinator来控制树莓派
在本文中,我们将学习如何通过Wekinator平台使用机器学习来控制树莓派。Wekinator是一个做机器学习项目的平台,通过processing 给Wekinator输入指令,经过学习Wekinator会给出相应的输出,这样我们就可以控制连接到Raspberry Pi GPIO引脚的LED或其他设备了。
电路图

首先,将LED的正极连接到树莓派的GPIO4,然后用220欧姆电阻将LED的负极连接到树莓派的GND引脚。
软件安装
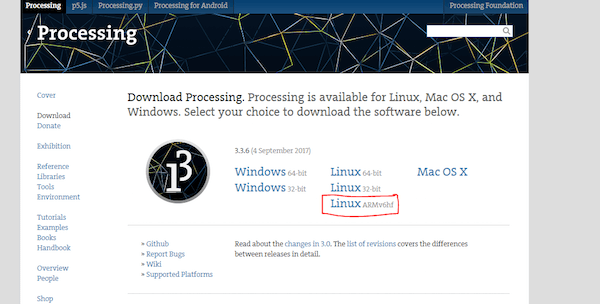
这里需要在树莓派上安装processing IDE,下载Linux ARMv6hf 的processing版本,地址:https://processing.org/download/。
下载后,将其放到想要安装processing的文件夹中,然后,右键点击选择“extract here”。这样将创建一个名为“processing”的文件夹,右键单击这个文件夹并选择“Open in terminal”,命令终端窗口将打开,在其中输入以下命令打开processing IDE。
./processing
现在需要安装Wekinator软件。点击下图所示的链接,选择“any OS, including Linux”下载。

下载后,将其放到想要安装的文件夹中,然后,右键点击选择“extract here”。这样将创建一个新文件夹,右键单击这个新文件夹并选择“Open in terminal”,命令终端窗口将打开,在其中输入以下命令打开Wekinator。
java -jar WekiMini.jar
开始
现在将本文末尾给出的代码粘贴到两个单独的Processing sketch 中并运行它们。在Wekinator窗口中,进行如下设置,设置inputs和outputs为“1”,“All classifiers”下设置为with “2” classes。

单击“next”,将打开一个新窗口,如下所示。
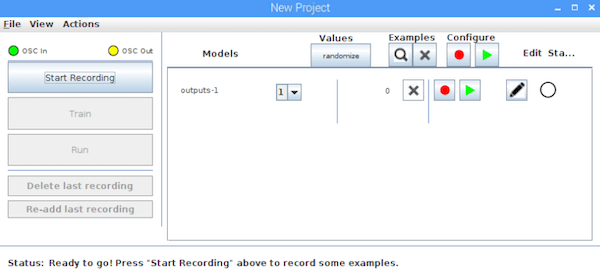
点击绿色三角形,开始录音,单击红色圆圈,将class更改为2(outputs-1这里),然后开始录音。之后,点击“Train”,然后点击“Run”。现在当你点击绿色三角形时,连接到树莓派的LED会点亮,当你点击红色圆圈时,连接到树莓派的LED会关闭。
示例代码
Processing代码(Wekinator输入)
// Importing the library which will help us in communicating with the wekinator
import oscP5.*;
import netP5.*;

//creating the instances
OscP5 oscP5;
NetAddress dest;

float bx;

void setup() {
  // Size of output window
  size(200, 50, P3D);

 // Starting the communication with wekinator. listen on port 9000, return messages on port 6448
  oscP5 = new OscP5(this,9000);
  dest = new NetAddress("127.0.0.1",6448);
}

void draw() {
  // Creating the boxes in output window
  blocks();

  // Send the OSC message to wekinator
  sendOsc();
}

void mousePressed()
{
  // If mouse is pressed in the first box
  if (mouseX > 0 && mouseX < 50)
  {
    bx=1;
  }

  // If mouse is pressed in the second box
  if (mouseX > 100 && mouseX < 150)
  {
    bx=2;
  }

}

void sendOsc() {
  OscMessage msg = new OscMessage("/wek/inputs");
  msg.add((float)bx);
  oscP5.send(msg, dest);
}

void blocks()
{
  background(0);
  fill(0, 128, 0);
  ellipse(25, 25, 50, 50);
  fill(255);
  text("ON", 10, 30);

  fill(255, 0, 0);
  ellipse(125, 25, 50, 50);
  fill(255);
  text("OFF", 120, 30);
}
Processing代码(Wekinator输出)
// Importing the library that will help us in controlling the GPIO pins of raspberry pi
import processing.io.*;

// Importing the library which will help us in communicating with the wekinator
import oscP5.*;
import netP5.*;

// Creating the instances
OscP5 oscP5;
NetAddress dest;

// Variable to store the output
public int output;

void setup()
{
  // Setting the GPIO 4 as output pin
   GPIO.pinMode(4, GPIO.OUTPUT);


  // Starting the communication with wekinator. listen on port 12000, return messages on port 6448
  oscP5 = new OscP5(this, 12000);
  dest = new NetAddress("127.0.0.1", 6448);
}


// Recieve OSC messages from Wekinator
void oscEvent(OscMessage theOscMessage) {
  if (theOscMessage.checkAddrPattern("/wek/outputs") == true) {
    // Receiving the output from wekinator
    float value = theOscMessage.get(0).floatValue();

    // Converting the output to int type
      output = int(value);
  }
}

void draw()
{
  // Making the led HIGH or LOW depending on the output from the wekinator
  if (output == 1)
  {
    GPIO.digitalWrite(4, GPIO.HIGH);
  }
  else if (output == 2)
  {
    GPIO.digitalWrite(4, GPIO.LOW);
  }
}


